admin

Guideline to setup funding and swap curve for backtest

How it work


In a previous blog post A Comprehensive Guide to Funding Rates in FX and Crypto Markets, it highlighted the significance of the funding rate in developing an effective trading strategy. This article provides a practical example to demonstrate how to set up customized funding curves on ALGOGENE platform


Data Preparation

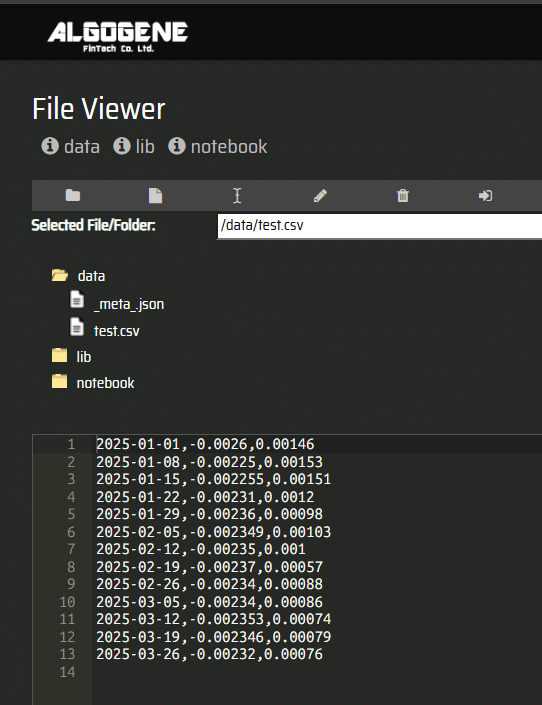
The steps are similar to this article Guideline to backtest with custom datasets. Suppose we have below CSV file test.csv containing the swap fee history of EURUSD. In this example, we assume the funding rate is updated on a weekly basis.

Date,Long,Short
2025-01-01,-0.0026,0.00146
2025-01-08,-0.00225,0.00153
2025-01-15,-0.002255,0.00151
2025-01-22,-0.00231,0.0012
2025-01-29,-0.00236,0.00098
2025-02-05,-0.002349,0.00103
2025-02-12,-0.00235,0.001
2025-02-19,-0.00237,0.00057
2025-02-26,-0.00234,0.00088
2025-03-05,-0.00234,0.00086
2025-03-12,-0.002353,0.00074
2025-03-19,-0.002346,0.00079
2025-03-26,-0.00232,0.00076

This file contains 3 columns:

  • Date: represent the date when there are updates on funding rate figures. During backtest, the last observed funding rates will be used for calculation.
  • Long: the rate used for a net long position to calculate the funding amount
  • Short: the rate used for a net short position to calculate the funding amount

Data Import

Now, let's import our data files as follows:

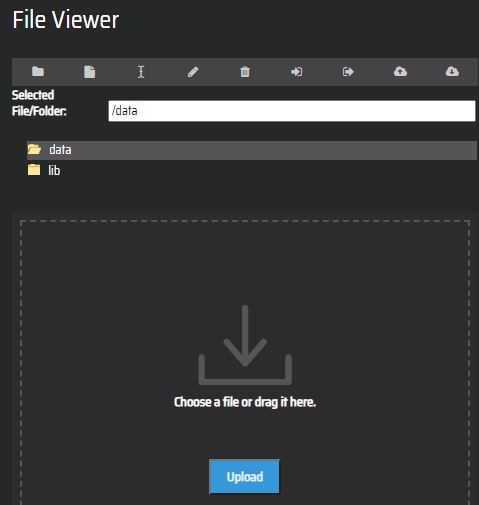
  • After login the portal, go to [My History] > [Custom File Viewer]
  • Select '/data' directory, then upload data files
  • import

  • We can then 'Edit' to view the uploaded content
  • view

  • Now, we need to create a meta file '_meta_.json' to instruct the system how to process the data files.
    • '_meta_.json' is in JSON format where we can specify the curve name in the first key. In this example, we label it as 'EURUSDswap'
    • the second key of '_meta_.json' should contain the following
      • 'file': the file name on the cloud directory
      • 'file_delimiter': the file delimiter used in our data file
      • 'fmt_time': the date format used in our data file, in Python date encoding
        • %Y: the year in four-digit format, eg. "2018"
        • %y: the year in two-digit format, that is, without the century. For example, "18" instead of "2018"
        • %m: the month in 2-digit format, from 01 to 12
        • %b: the first three characters of the month name. eg. "Sep"
        • %d: day of the month, from 1 to 31
        • %H: the hour, from 0 to 23
        • %M: the minute, from 00 to 59
        • %S: the second, from 00 to 59
        • %f: the microsecond from 000000 to 999999
        • %Z: the timezone
        • %z: UTC offset
        • %j: the number of the day in the year, from 001 to 366
        • %W: the week number of the year, from 00 to 53, with Monday being counted as the first day of the week
        • %U: the week number of the year, from 00 to 53, with Sunday counted as the first day of each week
        • %a: the first three characters of the weekday, e.g. Wed
        • %A: the full name of the weekday, e.g. Wednesday
        • %B: the full name of the month, e.g. September
        • %w: the weekday as a number, from 0 to 6, with Sunday being 0
        • %p: AM/PM for time
      • 'col_time': the column index of date (first column index = 0)
      • 'col_long': the column index of long side (first column index = 0)
      • 'col_short': the column index of short side (first column index = 0)
    meta

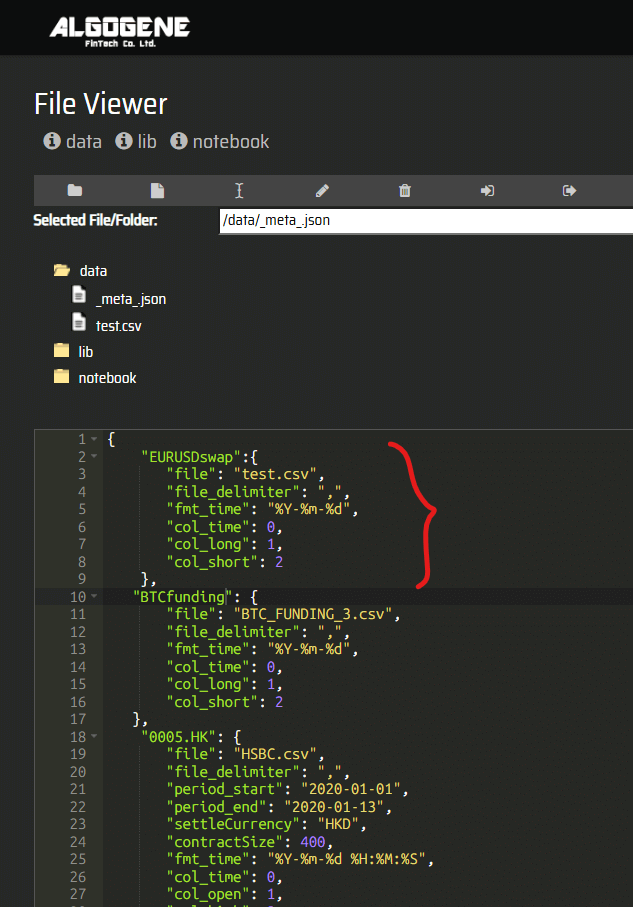
The sample meta file used in the example can be copied here:

{
    "EURUSDswap":{
       "file": "test.csv",
       "file_delimiter": ",",
       "fmt_time": "%Y-%m-%d",
       "col_time": 0,
       "col_long": 1,
       "col_short": 2
    }
}

Backtest

After we properly setup the '_meta_.json', we can then add our funding curves for backtest.

  • Go to [Backtest] > [Setting]
  • instrument
  • Select 'EURUSD' in the instrument panel
  • 'Start Period' and 'End Period' set to '2025-01' and '2025-03' respectively
  • 'Initial Capital' set to 100,000
  • 'Base Currency' set to 'USD'

Then, in backtest script, we can use self.evt.setFundingCurve() function to assign the funding curve (see line #12 below). As an example, we just open a buy order at the beginning of the backtest without any close order logic.

The full source code of our example as below:

 1
 2
 3
 4
 5
 6
 7
 8
 9
10
11
12
13
14
15
16
17
18
19
20
21
22
23
24
25
26
27
28
from AlgoAPI import AlgoAPIUtil, AlgoAPI_Backtest
from datetime import datetime, timedelta


class AlgoEvent:
    def __init__(self):
        self.isfirsttrade = False

    def start(self, mEvt):
        self.evt = AlgoAPI_Backtest.AlgoEvtHandler(self,mEvt)

        self.evt.setFundingCurve(instrument="EURUSD", curve_name="EURUSDswap")

        self.evt.start()

    def on_marketdatafeed(self, md, ab):
        if not self.isfirsttrade:
            self.isfirsttrade = True
    
            order = AlgoAPIUtil.OrderObject(
                instrument = md.instrument,
                volume = 0.01,
                openclose = 'open',
                buysell = 1,
                ordertype = 0 #market order
            )
            self.evt.sendOrder(order)
            

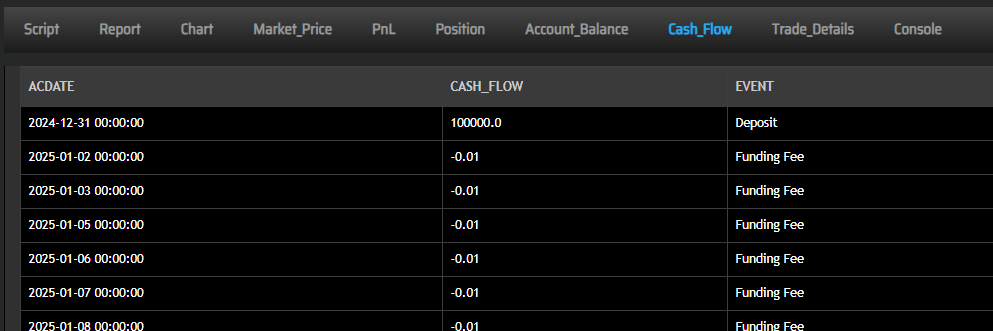
After running the backtest, we can see that daily funding fee is calculated and reflected in account balance.

backtest


Now, you learnt how to include funding rate curves on the platform. Try backtest with a custom dataset today! Happy Trading!


Edward
Thanks for adding this feature. It would be useful to closely simulate a real market situation.   
Does ALGOGENE has any swap curves to choose? or do I have to upload myself? 
Also, can I set funding curve for my custom data as well? 

 
admin
Original Posted by - Edward:
Thanks for adding this feature. It would be useful to closely simulate a real market situation.   
Does ALGOGENE has any swap curves to choose? or do I have to upload myself? 
Also, can I set funding curve for my custom data as well? 

In the financial market, brokers and exchanges often include their operating costs in the swap fee (or funding rate), leading to variations in funding rates among different brokers. As a result, we leave it for users the flexibility to define their own rates.
 
admin
Original Posted by - Edward:
Thanks for adding this feature. It would be useful to closely simulate a real market situation.   
Does ALGOGENE has any swap curves to choose? or do I have to upload myself? 
Also, can I set funding curve for my custom data as well? 

For the second question, our system also supports the configuration of funding rates for custom instruments. There are two ways to achieve this.


1. Upload as 2 Separate Files

Suppose we have 2 data files for a custom instrument "XXX".

  • "XXX.csv" - market data (i.e. open, high low, low, volume)
  • "XXXswap.csv" - funding data
Date,Open,High,Low,Close,Volume
2020-01-02,6.730000,6.830000,6.730000,6.800000,239292513
2020-01-03,6.830000,6.850000,6.720000,6.720000,277420033
2020-01-06,6.700000,6.710000,6.580000,6.650000,260518248
2020-01-07,6.640000,6.700000,6.600000,6.610000,204806676
2020-01-08,6.540000,6.590000,6.480000,6.560000,267421237
2020-01-09,6.650000,6.710000,6.600000,6.670000,215859440
2020-01-10,6.730000,6.750000,6.680000,6.720000,223748680
2020-01-13,6.740000,6.830000,6.740000,6.800000,481124394
...

Date,Long,Short
2020-01-01,-0.0026,0.00146
2020-01-08,-0.00225,0.00153
2020-01-15,-0.002255,0.00151
2020-01-22,-0.00231,0.0012
2020-01-29,-0.00236,0.00098
...

After uploading the 2 files, we can then configure "_meta_.json" as follows:

{
    "XXXswap":{
       "file": "XXXswap.csv",
       "file_delimiter": ",",
       "period_start": "2020-01-01",
       "period_end": "2020-01-31",
       "fmt_time": "%Y-%m-%d",
       "col_time": 0,
       "col_long": 1,
       "col_short": 2
    },
   "XXX": {
       "file": "XXX.csv",
       "file_delimiter": ",",
       "period_start": "2020-01-01",
       "period_end": "2020-01-31",
       "settleCurrency": "USD",
       "contractSize": 1,
       "fmt_time": "%Y-%m-%d",
       "col_time": 0,
       "col_open": 1,
       "col_high": 2,
       "col_low": 3,
       "col_close": 4,
       "col_volume": 5
   }
}

Finally, in backtest script, we can set instrument and curve_name to "XXX" and "XXXswap" respectively.

from AlgoAPI import AlgoAPIUtil, AlgoAPI_Backtest
from datetime import datetime, timedelta


class AlgoEvent:
    def __init__(self):
        self.isfirsttrade = False

    def start(self, mEvt):
        self.evt = AlgoAPI_Backtest.AlgoEvtHandler(self,mEvt)

        self.evt.setFundingCurve(instrument="XXX", curve_name="XXXswap")

        self.evt.start()

    def on_marketdatafeed(self, md, ab):
        if not self.isfirsttrade:
            self.isfirsttrade = True
    
            order = AlgoAPIUtil.OrderObject(
                instrument = md.instrument,
                volume = 0.01,
                openclose = 'open',
                buysell = 1,
                ordertype = 0 #market order
            )
            self.evt.sendOrder(order)


2. Combine and Upload as a Single File

Alternatively, we can combine the 2 files above into a single file "XXX.csv" like:

Date,Open,High,Low,Close,Volume,Long,Short
2020-01-02,6.73,6.83,6.73,6.8,239292513,-0.0026,0.00146
2020-01-03,6.83,6.85,6.72,6.72,277420033,-0.0026,0.00146
2020-01-06,6.7,6.71,6.58,6.65,260518248,-0.0026,0.00146
2020-01-07,6.64,6.7,6.6,6.61,204806676,-0.0026,0.00146
2020-01-08,6.54,6.59,6.48,6.56,267421237,-0.00225,0.00153
2020-01-09,6.65,6.71,6.6,6.67,215859440,-0.00225,0.00153
2020-01-10,6.73,6.75,6.68,6.72,223748680,-0.00225,0.00153
2020-01-13,6.74,6.83,6.74,6.8,481124394,-0.00225,0.00153

Then, the file "_meta_.json" can be configured as follows:

   "XXX": {
       "file": "XXX.csv",
       "file_delimiter": ",",
       "period_start": "2020-01-01",
       "period_end": "2020-01-31",
       "settleCurrency": "USD",
       "contractSize": 1,
       "fmt_time": "%Y-%m-%d",
       "col_time": 0,
       "col_open": 1,
       "col_high": 2,
       "col_low": 3,
       "col_close": 4,
       "col_volume": 5,
       "col_long": 6,
       "col_short": 7
   }
}

Finally, in backtest script, we can set instrument and curve_name both to "XXX".

from AlgoAPI import AlgoAPIUtil, AlgoAPI_Backtest
from datetime import datetime, timedelta


class AlgoEvent:
    def __init__(self):
        self.isfirsttrade = False

    def start(self, mEvt):
        self.evt = AlgoAPI_Backtest.AlgoEvtHandler(self,mEvt)

        self.evt.setFundingCurve(instrument="XXX", curve_name="XXX")

        self.evt.start()

    def on_marketdatafeed(self, md, ab):
        if not self.isfirsttrade:
            self.isfirsttrade = True
    
            order = AlgoAPIUtil.OrderObject(
                instrument = md.instrument,
                volume = 0.01,
                openclose = 'open',
                buysell = 1,
                ordertype = 0 #market order
            )
            self.evt.sendOrder(order)