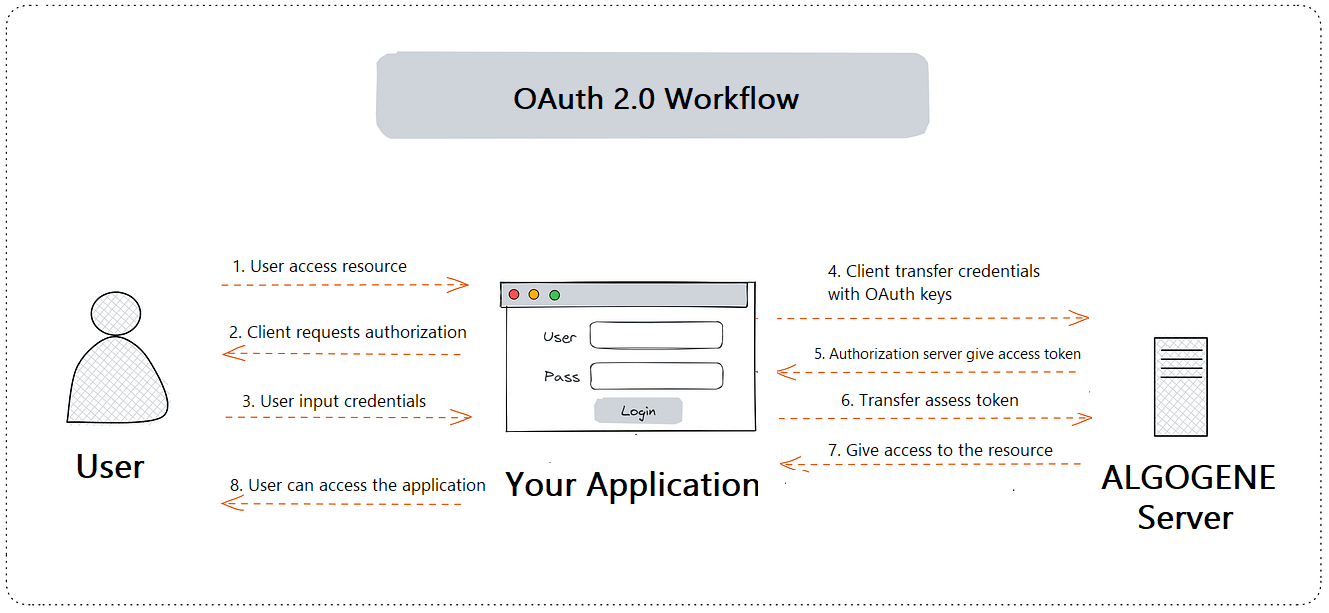
ALGOGENE now supports Open Authorization (OAuth) that allows third party application to access to ALGOGENE member data. In this article, we will go through the steps to setup OAuth to link with ALGOGENE.

What can you do with ALGOGENE OAuth API?
ALGOGENE is a global algo-trading community that serves as a treasure trove of data for quant developers and professional traders. This data is something that a brokerage firm, a recruitment firm, or other sales automation products would love to integrate into their offerings.
Once you become an ALGOGENE Partner, you will gain access to the following APIs:
- Profile API: Allows access to a user's ALGOGENE profile information. You can access basic profile details, pictures, and headlines.
- Skillset API: Allows access to a user's overall coding skills in developing algorithms on ALGOGENE
- Activity API: Allows access to a user's activities on ALGOGENE such as number of strategies created, articles posted, etc.
Preparation
Obtain your user_id and api_key as follows:
- Login ALGOGENE
- Go to [Settings] page, then [Profile] section
- Get your ALGOGENE user ID
- Click "Generate" to get your API Key
Step 1. Generate authorization URL
To get permission from a user, you will generate an authorization URL to send your user to login ALGOGENE, where they can permit your application to access their profile.
In this case, you must provide a redirect_url, the link to which ALGOGENE will send the user back after they have finished granting permission.
A unique state can be served as a form of identifier for this user on your website/application.
1 2 3 4 5 6 7 8 9 10 11 12 13 14 15 16 17 18 19 20 21 22 | import requests, random, string USER_ID = "xxx" API_KEY = "YYY" CALLBACK_URL = "https://example.com/oauth/callback" def generate_auth_url(): """ 'state' is randomly generated for a length of 10 """ state = ''.join(random.choices(string.ascii_uppercase + string.digits, k=10)) url = "https://algogene.com/rest/v1/oauth/authorization" headers = {"Content-Type": "application/json"} params = { "user": USER_ID, "api_key": API_KEY, "state": state, "redirect_url": CALLBACK_URL } res = requests.get(url, params=params, headers=headers) return res.json()['url'] |
This Python function will generate an authetication URL. You will need to render this URL on your application for user to login ALGOGENE.
Step 2. Receive access token
After a user login through the authetication URL, you will be granted permission to access their profile. You will receive an access token attached in the redirect_url. With this token, you will be able to access the user's profile.
Suppose in step 1, you specified the followings
- 'state' = 123456
- 'redirect_url' = https://example.com/oauth/callback
After user login ALGOGENE, it will redirect the user back to your application. You will need to extract the token from your redirect_url as follows.

Step 3. Access user data
Now you are ready to fetch user data on ALGOGENE.
3.1. Get user profile data
1 2 3 4 5 6 7 8 9 | def get_profile(token): url = "https://algogene.com/rest/v1/oauth/userinfo" headers = {"Content-Type": "application/json"} params = { "user": USER_ID, "api_key": API_KEY, "token": token } return r.json() |
Available information for this API includes
- 'cid': the user's ID on ALGOGENE
- 'name': the user's name on ALGOGENE
- 'email': the user's registered email on ALGOGENE
- 'profile_url': the user's ALGOGENE profile page
- 'picture': the user's profile picture on ALGOGENE
