Suppose we already have a python package/function created on a local machine. This article will guide you through the steps to plug into ALGOGENE for backtest, live-test or real-trading.
Preparation
For example, we created a simple package called "my_model" on a desktop machine.

Figure 1 - local python package
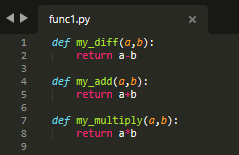
The whole package just has an empty "__init__.py" file, with a module file "func1.py". The module file contains 3 simple functions as follows.

Figure 2 - source code in "func1"
File Upload
Then, we can upload the package to ALGOGENE as follows.
- after login the platform, go to [My History] > [Custom File Viewer]
- select "/lib" in the cloud directory, then drag our local packge on it

Figure 3 - upload files to ALGOGENE cloud
Upon successful upload, the cloud directory should look something like.
Figure 4 - cloud file tree
Backtest Example
Suppose we want to use "my_diff" function in "func1.py" to calculate the market spread and print the result to console. It can be done as follows:
- after "self.evt" is initialized (at line 8)
- use "self.evt._include(...)" to include our package in python runtime environment (at line 11)
- import our desired module, and declare the module as global variable (at line 12-13)
- we can then call the module functions anywhere in the backtest script (at line 19)
1 2 3 4 5 6 7 8 9 10 11 12 13 14 15 16 17 18 19 20 | from AlgoAPI import AlgoAPIUtil, AlgoAPI_Backtest class AlgoEvent: def __init__(self): pass def start(self, mEvt): self.evt = AlgoAPI_Backtest.AlgoEvtHandler(self, mEvt) # include my package to python environment, then import a function self.evt._include("my_model") global func1 import func1 self.evt.start() def on_marketdatafeed(self, md, ab): # call my function v = func1.my_diff(md.askPrice, md.bidPrice) self.evt.consoleLog(v) |
We can find the calculated results from console.
Figure 5 - console log
That's it!
